Set up and start your first session
Your headset arrives ready to go. These steps take about ten minutes.
Keep your headset offline
Your AVRcore headset arrives with every app installed and ready to go, no internet needed. Please don’t connect it to Wi-Fi: going online can trigger updates that stop your apps from working.
It’s your headset, though. If you’d ever like to use it as a regular Meta Quest, you can factory reset it and set it up with your own Meta account. A reset permanently changes how your headset looks and works. Contact us before you reset, and we’ll help you get your AVRsuite apps back afterward. How it works
What's in the box
- Meta Quest 3S headset
- Two hand controllers with batteries
- Charging cable
- KIWI comfort head strap
If you ordered extras, you’ll also find a silicone face cover or controller hand straps.
Charging
Plug the cable into the headset and into any USB power outlet. A full charge takes about two hours and lasts several sessions.
Charge after each day of use so it’s ready next time.
Putting it on
Fit
Loosen the back strap, slide the headset on like ski goggles, then tighten until it’s snug but comfortable. It shouldn’t press hard on your face.
Clear picture
If things look blurry, gently push the lenses together or pull them apart until you feel them click. Check the picture and try the next position if needed. Moving the headset slightly up or down on your face also helps.
Watch how from Meta
Your headset is a Meta Quest 3S. These short guides from Meta show the basics. Your AVRcore headset uses a KIWI comfort strap, so the strap may look different from Meta’s, but the fit steps are the same idea: snug, comfortable, and centered on your eyes.
- Wearing your Meta Quest 3S(video)
- Adjust Meta Quest headset fit and feel
- Learn about lens spacing on Meta Quest
Skip any Meta steps about Wi-Fi, accounts, or updates. Your AVRcore headset stays offline.
Know your headset and controllers
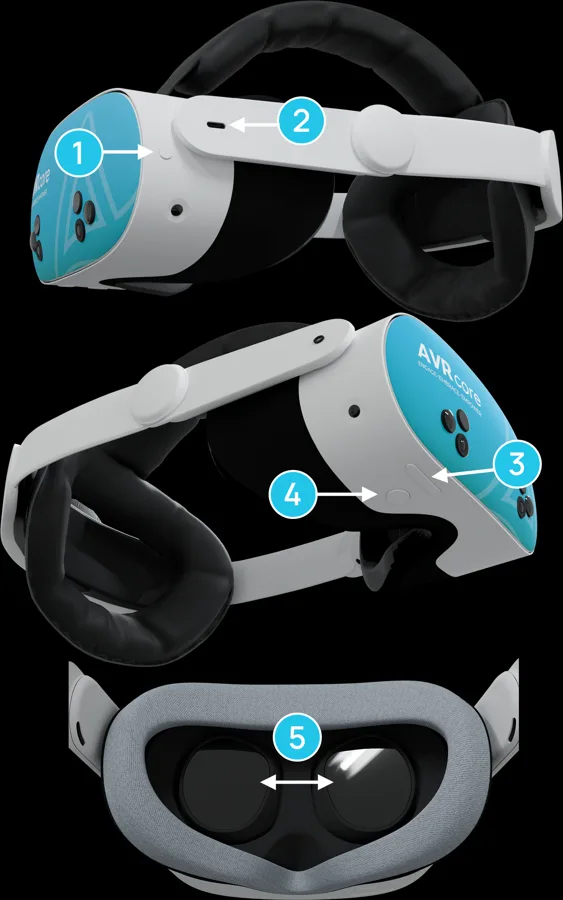
- USB-C charging port
- Power button
- Volume buttons
- Passthrough toggle
- Lens distance control
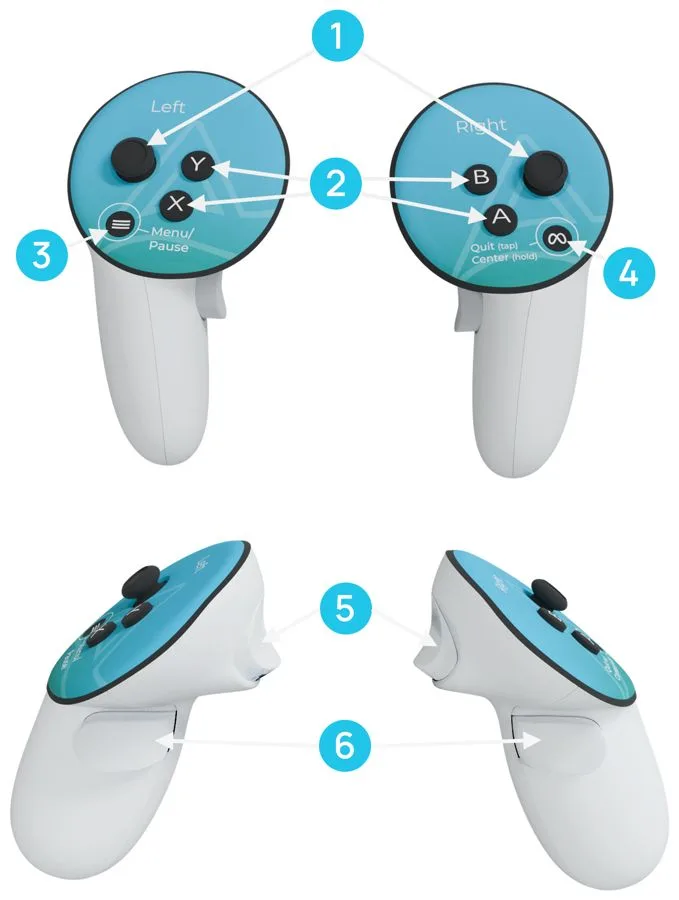
- Thumbstick
- Action buttons
- Menu button: pause
- Meta button: quit or recenter
- Trigger
- Grip button
Using the controllers
- Wake them: pick them up. If one doesn’t respond, hold its Menu (left) or Meta (right) button for two seconds.
- Point and select: point a controller like a flashlight and squeeze the trigger.
- Home menu: press the round Meta button any time.
- Go back: press B.
How the apps work
- Gaze: move your head to place the small circle on a button, and hold it there until the circle closes.
- Touch: reach toward a button and touch it with your finger or controller.
- Lobby: choose a different activity.
- Pause: rest any time. Nothing is lost.
- Quit: from the Lobby, return to your home menu.
Before your first session
- 1Find your apps. They're already in your library. No account, password, or store.
- 2Clear your space. Leave a few feet of open room on every side, and keep pets and people out of it.
- 3Have a sturdy chair ready. Start every app seated, except StarGait.
- 4Start short. 5 to 10 minutes at a time, then build up as you get comfortable.
- 5Read the safety page once. It tells you when to stop and take a break.
Still need help?
Our team answers Monday to Friday, 8:00 AM to 6:00 PM Central Time.